Applying transformations, such as rotations, to your text in Photoshop can be a great way to take your typographic pieces to the next level. Yet, whilst it is fairly simple to rotate bodies of text as a whole, we can encounter problems when we try to rotate individual letters in isolation.
Luckily, this can be achieved by converting the text layer to a shape layer, then using the Direct Selection Tool to select a single letter. By then using the regular free transform box to rotate or scale the letter, you will find that you are able to create more complex text effects more efficiently and easily!
Remember, you can rotate all the text within a layer by simply hitting Ctrl + T [Win] / Cmd + T [Mac] before clicking and dragging anywhere outside the box to turn the text and pressing Enter [Win] / Return [Mac] to apply the transformation.
Here is a summary of what we will cover in this article:
Table of Contents
- How to Rotate and Apply Other Transformations to a Whole Body of Text
- 1: Use the Type Tool to Type the Text You Want
- 2: Go to Edit > Free Transform Then Click and Drag Outside the Box to Rotate the Text
- 3: Rotate Text by Set Amounts Using the Transform Options Displayed by Right-Clicking
- 4: Right-Click and Choose Flip Horizontal or Flip Vertical to Flip Your Text Layer
- 5: Change the Size of Your Text by Clicking and Dragging One of the Handles of the Free Transform Box
- How to Rotate and Apply Other Transformations to Individual Letters
- 1: Convert the Text Layer to a Shape Layer by Choosing Type > Convert to Shape
- 2: Rotate an Individual Letter by Selecting it With the Direct Selection Tool Then Rotating It
- 3: Flip an Individual Letter by Selecting it with the Direct Selection Tool Then Flipping It
- 4: Change the Scale of an Individual Letter by Selecting it With the Direct Selection Tool Then Dragging a Handle of the Free Transform Box
- BONUS
There is a video at the end of this article explaining everything step by step, click here to jump directly to it.
How to Rotate and Apply Other Transformations to a Whole Body of Text
Let’s begin by discussing the basic way of rotating text in Photoshop. This method only works for rotating whole bodies of text, meaning that following the method will cause all the contents of the text layer to be rotated by the same amount.
1: Use the Type Tool to Type the Text You Want
Of course, we will need to start by adding some text to our document.
Working in either a new empty document (which can be created by choosing File > New from the top of the screen) or an existing one (which can be opened by selecting File > Open), head over to the toolbar down the left of the screen, and select the Type Tool, represented by a ‘T’ icon.
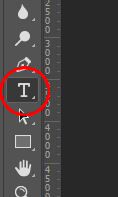
Clicking this icon will cause Photoshop to make the tool active. With the right tool now selected, you can click anywhere within the Document Window and start typing the text you want.

The values are shown as percentages. For instance, you can see that in our example, our zoom level is around 21%.

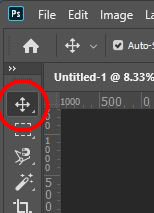
If you want to reposition your text, then simply select the Move Tool (V) from the top of the toolbar down the left side of the screen, then use your mouse to click on the text and drag it to a new position.
2: Go to Edit > Free Transform Then Click and Drag Outside the Box to Rotate the Text
Once you are happy with the text’s properties, you’re ready to rotate it! We can do this using Photoshop’s Free Transform options.
Head over to the Menu Bar at the top of the screen and select Edit > Free Transform. Alternatively, you could use the keyboard shortcut Ctrl + T [Win] / Cmd + T [Mac].
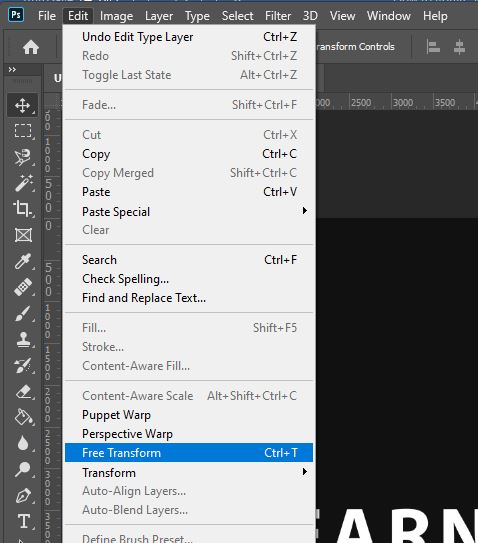
Doing this will bring up a box with handles on the corners around the piece of text. You can use this to apply a variety of transformations to your layer, such as flips, rotations, and scales.

To rotate the text, we are going to click anywhere outside this box and hold down the mouse whilst dragging the cursor around to either the right or left to rotate it clockwise or counterclockwise.
Release the mouse once you’re satisfied with the extent of the rotation.

3: Rotate Text by Set Amounts Using the Transform Options Displayed by Right-Clicking
Whilst this technique is the best for applying precise rotations to your text layers (or normal layers), there are quicker methods to use if you want to apply a commonly used rotation to your layer, such as one of 90 or 180 degrees.
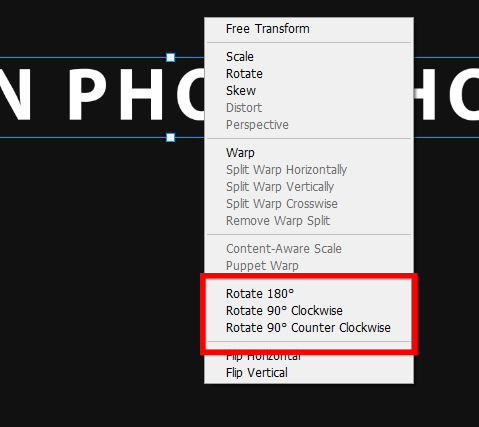
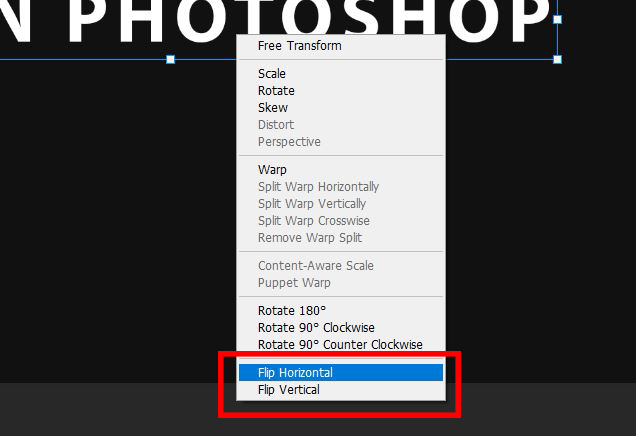
Such rotations can be applied by hitting Ctrl + T [Win] / Cmd + T [Mac] on your keyboard to bring up the ‘Free Transform box’, then right-clicking on the text and choosing either ‘Rotate 180 Degrees’, ‘Rotate 90 Degrees Clockwise’, or ‘Rotate 90 Degrees Counter Clockwise’ from the fly-out menu.
4: Right-Click and Choose Flip Horizontal or Flip Vertical to Flip Your Text Layer
You can also flip bodies of text by right-clicking on the text whilst the free transform mode is enabled (Ctrl + T [Win] / Cmd + T [Mac]) and choosing Flip Horizontal or Flip Vertical from the list that comes up.
5: Change the Size of Your Text by Clicking and Dragging One of the Handles of the Free Transform Box
Along with letting you rotate and flip layers, the Free Transform command also lets you resize layers.
To do so, hit Ctrl + T [Win] / Cmd + T [Mac] on your keyboard if the Free Transform box isn’t already around your text, then click on any of the corner handles and, whilst holding the Shift key, drag it outwards to make the text bigger, or inwards to make it smaller.

Holding the Shift key down whilst resizing an element causes Photoshop to preserve the original proportions of the layer.
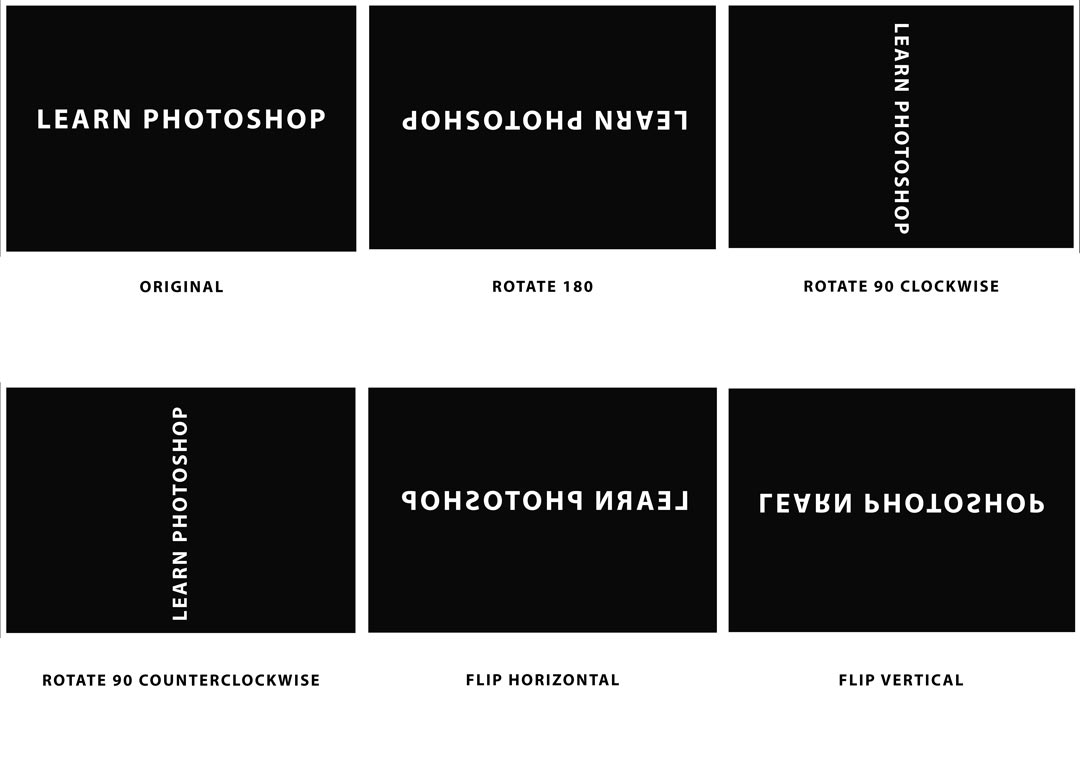
Here are the results of applying some of the above transformations to a piece of text.
To use it to zoom out of your image and get a wider view of your document, press and hold the Alt [Win] / Option [Mac] key on your keyboard to temporarily switch to ‘Zoom Out’ mode. Whilst you’re holding down this key, every click will tell Photoshop to zoom out of your document. You should notice that the sign inside the magnifying glass in the cursor changes from a plus to a minus.
To switch back to ‘Zoom In’ mode, just release the Alt [Win] / Option [Mac] key.
How to Rotate and Apply Other Transformations to Individual Letters
Whilst the basic options offered by Photoshop that let you apply transformations to text are useful for editing full words or bodies of text, you can run into issues if you want to transform individual letters. What if we want to rotate or flip just one letter within a body of text?
Since all the letters will probably be on the same text layer, you cannot apply edits to individual ones, just the layer as a whole. We can see this when we hit Ctrl + T [Win] / Cmd + T [Mac], as doing so causes a transformation box to appear around the entire piece of text, rather than creating boxes around each letter.
So, how can we solve this issue and give ourselves the ability to edit individual letters? Well, the issue occurs because Photoshop does not let you select individual letters in a line of text when it is in the text format.
Therefore, if we convert the layer to a different format, then we can preserve the appearance of the text but give ourselves more capabilities. The best thing to change the text layer to in this case is a shape layer, as this will let us edit individual letters and will preserve the sharp edges of the text no matter how we edit it.
1: Convert the Text Layer to a Shape Layer by Choosing Type > Convert to Shape
To convert the text layer into a shape layer, we are first going to make sure that the layer is active (highlighted in the Layers Window as shown below).
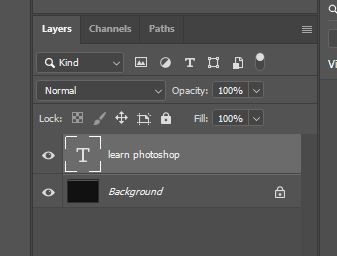
Then, let’s head along the top of the screen to Type > Convert to Shape.
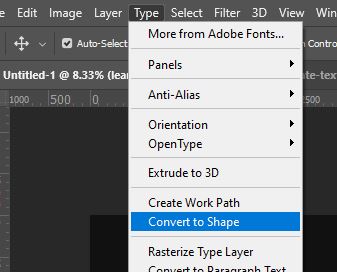
After selecting these options, you should have successfully changed the layer into the shape format!
You won’t be able to notice many changes in the appearance of the document (as shown in the Document Window), but if you draw your attention over to the Layers Window at the bottom right of the screen, the thumbnail should show that the text layer has been turned into a shape layer.
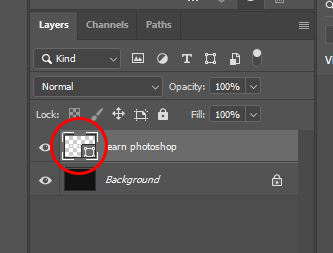
We can now apply transformations to individual letters! Check out the sections below to find out more about how to apply each type of transformation.
2: Rotate an Individual Letter by Selecting it With the Direct Selection Tool Then Rotating It
First, let’s explore how you can rotate an individual letter. To begin with, we will have to select the letter that we want to rotate. For instance, in our example, we selected the letter ‘H’, since that was the one we planned on rotating.
After converting the text to a shape, we can select an individual letter using the Direct Selection Tool, which can be selected from the toolbar down the left side of the screen by right-clicking on the black arrow icon, then choosing the right tool from the fly-out menu.

With the Direct Selection Tool active, head back over to the Document Window and click within the canvas on the letter that you want to rotate. You should notice that this causes anchor points to appear around the letter, indicating that the letter has been selected.

You can then carry out the same process that you would use to rotate a whole body of text, beginning with hitting Ctrl + T [Win] / Cmd + T [Mac] to bring up the free transform options, then clicking and dragging anywhere outside the box around the letter to rotate it either clockwise or anticlockwise.

Remember to press the Enter [Win] / Return [Mac] button on your keyboard when you’re done in order to apply the transformation.
Then just repeat the process of using the Direct Selection Tool to individually select each letter you want to rotate before following the same rotation method.
3: Flip an Individual Letter by Selecting it with the Direct Selection Tool Then Flipping It
Another transformation that can be applied to an individual letter once the text has been converted to a shape is a reflection, or, in other words, a flip.
To flip an individual letter, you will first need to select the Direct Selection Tool by right-clicking on the black arrow icon from the toolbar down the left side of the screen, then selecting the right tool from the list that appears.

With this tool active, you can then click on the letter you want to flip to select it.

Then, hit Ctrl + T [Win] / Cmd + T [Mac] on your keyboard to bring up the free transform box, before right-clicking on the letter and selecting either Flip Horizontal or Flip Vertical from the list that pops up.

4: Change the Scale of an Individual Letter by Selecting it With the Direct Selection Tool Then Dragging a Handle of the Free Transform Box
The final transformation that we will discuss is scaling (in other words, changing the size of) an individual letter. You should hopefully be able to see a pattern emerging in the processes used to apply these transformations.
Again, once we have converted the text layer into a shape layer, we will begin by right-clicking on the Direct Selection Tool from the toolbar down the left side of the screen (represented by the icon shown below), then choosing the Direct Selection Tool from the fly-out list.

With the tool selected, head over to the Document Window and click on the letter that you want to change the size of.
Then, press Ctrl + T [Win] / Cmd + T [Mac] to bring up a free transform box around the letter.

You can now simply click on any one of the corner handles of this box and, whilst holding down the Shift key to preserve the original proportions of the layer, drag it outwards to enlarge the letter or inwards to make it smaller.

BONUS
That is about all there is to know about how to rotate, flip and scale whole bodies of text and individual letters.
Want to find out more about how you can apply these transformations to your text? Then check out this video by SmokeyTheAnbu which demonstrates how to rotate individual letters in Photoshop.
Hey, I'm a Professional Retoucher making $10k a month thanks to Photoshop.Register to my newsletter to get freelancing tips and a FREE Brush Pack in Bonus! My Newsletter


