
Recently, there have been thousands of designers producing work with a glitch effect. With its futuristic style and vibrant character, the effect can be added to practically any visual form and look awesome.
In this article, we’ll discuss how to create a glitch effect in typography, that can take the text in your work to the next level.
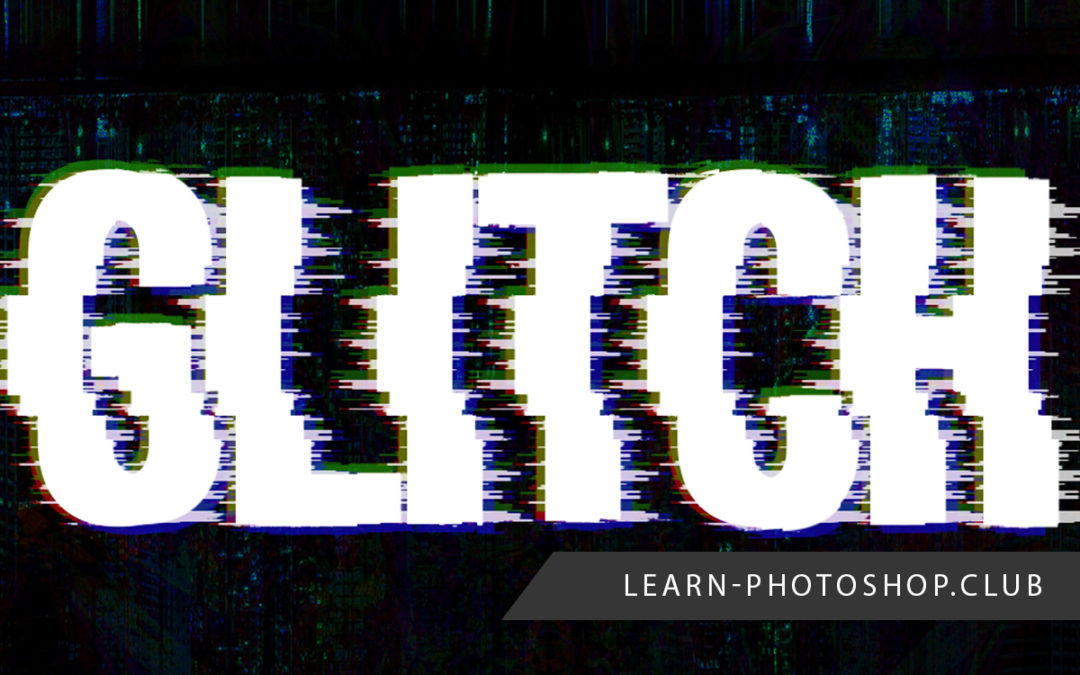
To create a Glitch Effect on a Text Layer with Photoshop we will use the Wave Filter several times on duplicated smart layers. We’ll finally add different color overlays to our Wave Filter layer to create this glitch effect.
1: Open Photoshop and Create a New Document
We’ll of course need to begin by opening or creating a document in which we can work. You can create a new document by selecting File > New and choosing the dimensions and color of your document. For this technique, I’d suggest a darker background and a large size, just so that you can see the details in the effect, as it can sometimes be fairly intricate.

For this tutorial, I’ll be using an image by Yatheesh Gowda from Pixabay, which I opened in Photoshop through choosing File> Open.

2: Type in the desired Text with the Type Tool
So, now that we have a document to work in, we can go ahead and make the text that we’ll add the effect to. Head to the toolbar down the left side of your screen and select the Type Tool (represented by the ‘T’ icon shown below).

With the right tool selected, you can click on the screen to start typing. You can alter the properties of the text along the top of the screen. For this technique, I find that it’s best to use a simple font, a larger size and a white color, which will stand out against the dark background, but feel free to experiment with any settings that you want. I used the font Bebas Neue.

3: Convert your Text Layer to a Smart Object
Once you’re satisfied with how your text looks, you can convert it to a Smart Object. These are really handy, as they allow for non-destructive editing whilst also allowing you to make alterations to a layer’s properties.
We can convert our text layer into a Smart Object by right-clicking on it and choosing Convert to Smart Object from the list that appears as a result.

4: Apply a Wave Filter
Now that our text has been converted into the right format, we can make changes to its properties, and start creating the glitch effect!
So, let’s begin by going to the options bar along the top of the screen and choosing Filter > Distort > Wave.

Doing so will open a dropdown menu, in which you’ll want to put the following settings. Feel free to change them up slightly but try to follow a similar structure to the ones below.
- Type: Square
- Number of Generators: 2
- Wavelength Min: 150
- Wavelength Max: 780
- Amplitude Min: 1
- Amplitude Max: 50
- Scale Horizontal: 20%
- Scale Vertical: 5%

5: Duplicate the Smart Object and apply the Wave Filter a second time
By this point, you will have created the first stage of the effect. To take it further, we’ll apply the effect multiple times, but to varying degrees, in order to make the glitch effect appear more convincing.
When working with Photoshop, it’s important to always try to prioritize a non-destructive way of working. So, to work non-destructively in this case, we will Duplicate the layer / Smart Object to which we just applied the effect, by pressing Ctrl + J [Win] / Cmd + J [Mac], or right clicking on the layer and selecting Duplicate Layer.

After duplicating the layer, we’ll head along the top of the screen to Filter > Distort > Wave and input the following settings:
- Type: Square
- Number of Generators: 2
- Wavelength Min: 90
- Wavelength Max: 320
- Amplitude Min: 1
- Amplitude Max: 270
- Scale Horizontal: 10%
- Scale Vertical: 1%

This will create the ‘medium-sized’ glitches, to add detail to the previous state of the effect.

6: Repeat the process a third time
Although we’ve taken the effect further already, we’ll just expand on it one more time to increase the extent of the glitch effect, and make it appear more detailed and convincing.
This time, we’ll focus on creating the smallest, most detailed glitches to enhance the effect.
Duplicate the layer again by right-clicking and selecting Duplicate Layer (Ctrl + J [Win] / Cmd + J [Mac]). With this layer active, head again to Filter > Distort > Wave and edit the settings to match the ones below:
- Type: Square
- Number of Generators: 5
- Wavelength Min: 1
- Wavelength Max: 35
- Amplitude Min: 5
- Amplitude Max: 37
- Scale Horizontal: 70%
- Scale Vertical: 2%

Feel free to experiment with these values until you’re happy with the outcome.
You can also decrease the opacity of this layer to make the effect a little less overwhelming.
7: Group all Three Smart Layers
We’re nearly finished at this stage, but there’s one thing we can do to improve the effect. For this step, we’ll add some subtle hints of color, which will make the outcome more ‘glitch-like’.
So, let’s go ahead and select all three layers (the original and duplicated Smart Objects) by holding down the Shift key on your keyboard whilst clicking on each layer individually.
You’ll see that they have all been highlighted, as below, to show that they’re all active.

Then just click on the folder-like icon at the bottom of the Layers Window to create a group from the selected layers.
8: Duplicate the Group Three Times
To add in color, we’ll want to work on separate layers to add some red, green, and blue to the piece. We can do this by adding Color Overlays. Of course, we’ll, therefore, need three groups (one for each color) and an extra one, as we’ll want to keep the original white group at the top.
So, create three duplicates of the group by hitting Ctrl + J [Win] / Cmd + J [Mac] three times. Your layers window should now look something like this:

Label the bottom three ‘Red’, ‘Green’, and ‘Blue’, in any order, and reduce the opacity of each group to 25%-50% (you can experiment with this), by changing the value with the slider at the top of the Layers Window.

9: Add a Color Overlay to Create a nice Glitch Effect
With the groups titled and organised, we can now begin adding color overlays. For each of the groups, double click on them in the Layers Window to bring up a new window in which you can edit the Layer Style.
In this window, we’ll select ‘Color Overlay’ from the menu down the left side.

Here, simply choose the respective color (red, green or blue), leaving the opacity at 100%. Click OK.
Once you’ve added the color overlay, use the arrow keys on your keyboard to move each colored group fractionally, to make the effect appear more random and to allow the colors to be seen more clearly.

With the colors added, you should end up with something like our outcome above!
And there you have it! You should now know how you can easily add a glitch effect to your text, and you’ll hopefully feel more confident with using the wave tool and distortion effects.
BONUS
Want to find out more about creating a glitch text effect in Photoshop? Then check out this video by PS Design that demonstrates a similar process, or this video by VerticDesigns that shows how you could create a glitch effect using different techniques.
Hey, I'm a Professional Retoucher making $10k a month thanks to Photoshop.Register to my newsletter to get freelancing tips and a FREE Brush Pack in Bonus! My Newsletter

