I am sure we are all aware of how irritating it can be when we need to edit a certain individual element within a Photoshop document but then we realise that this element is merged onto the contents of another layer. It can often be a really complex issue to workaround.
Unfortunately, you can’t undo the action of merging one layer to another unless you can travel back to that step within your History panel, or you have only just merged the layers (if this is the case and merging was your last action, then you can simply undo the edit by hitting Ctrl [Win] / Cmd [Mac] + Z on your keyboard).
However, there are a few ways in which you can separate the contents of the merged layer so that the elements are once again on their own individual layers. Although the first method we will discuss may take longer than a simple undoing, you will hopefully be able to tackle the issue and get back to creating awesome designs in no time!
Here’s a quick overview of the article:
1) The first method to unmerge layers if you don’t have access to the Photoshop history actions.
3) Some alternative ways to merge layers (non-destructive method)
Method One: Separate the Elements Using Layer Masks
Although it can be quite long-winded if you need to separate a significant number of elements, this method is fairly simple and is very effective at ‘unmerging’ layers.
Before we begin, do note that this method only tends to work if none of the elements that you want to move onto separate layers are hidden by other content that sits over the top. In other words, none of the contents should be overlapping. For clarification, let’s take a look at the examples below:
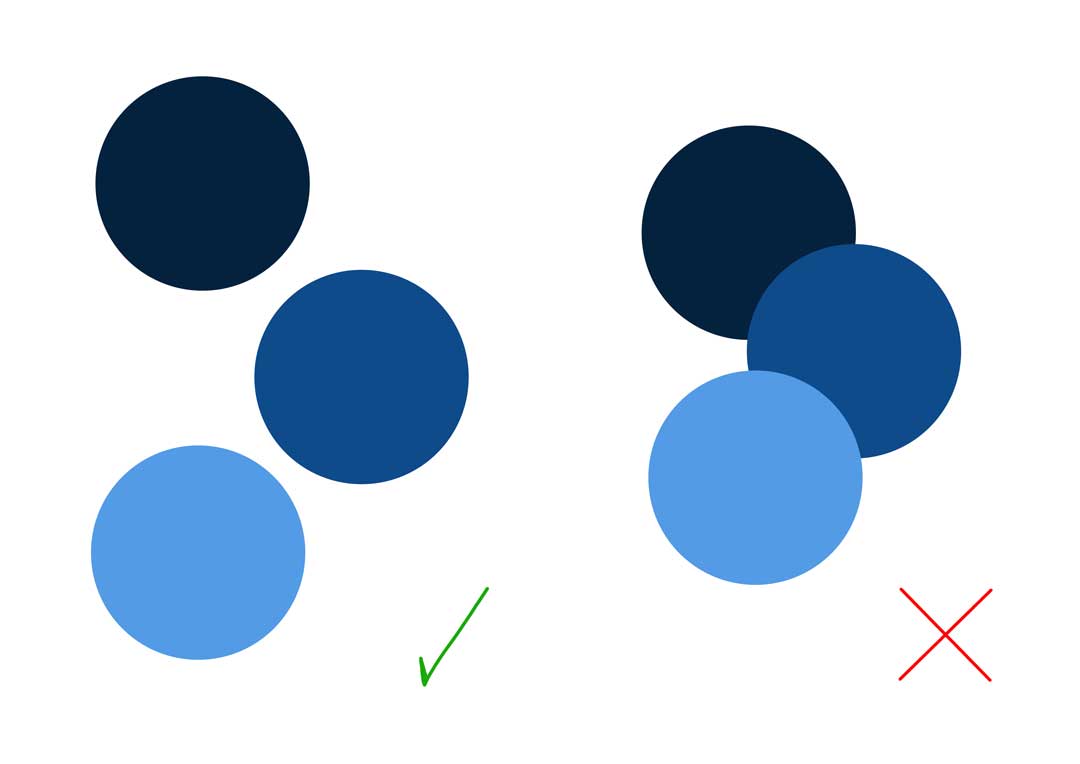
As you can see, we would be able to separate the contents of the layer in the left image since none of the individual elements are overlapping each other. By contrast, the method would not work with the example on the right because parts of the top two circles are hidden by the others. There is no way to retrieve this obstructed section, so you cannot get the full circle back.
1: Go to File > Open and Open the File Containing the Layer You Want to Resolve into Separate Layers
Of course, let’s begin by heading along the top of the screen to File > Open.

Choosing this option will take you to a window in which you can choose a document to open. From here, select the relevant PSD file containing the layers that you want to unmerge.
2: Duplicate the Merged Layer Once for Each Layer You Will Separate the Merged Layer Into
With the document open in Photoshop, we’re going to head over to the Layers Window in the bottom-right corner of the screen. If it isn’t open by default, then you can open it by choosing Window > Layer from the menu bar along the top of the screen.
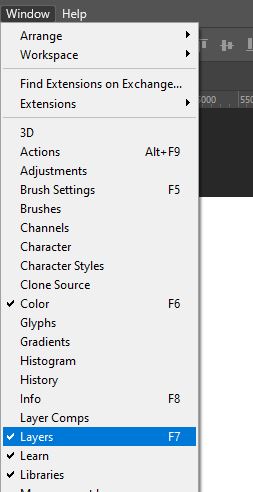
Here, find the layer that you want to unmerge the contents of to create separate layers, and click on it to make it active. It should now be highlighted, as shown below.
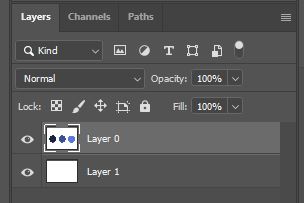
Since we have three elements (in this case, each of the circles) that we want to isolate into their own layers, we will need three copies of this layer. Therefore, we will need to now duplicate the layer twice so that we have three copies of it in total (including the original version).
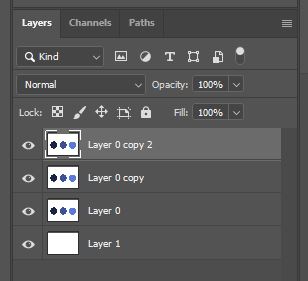
This will vary depending on the number of separate elements you want to resolve your layer into. For example, if you want to create six separate layers, then you will need to duplicate the merged layer five times.
To duplicate the merged layer, right-click on it in the Layers Window and select Duplicate Layer from the list that comes up as a result. Alternatively, this can be done through the keyboard shortcut Ctrl [Win] / Cmd [Mac] + J. Repeat this as many times as is necessary for your situation.
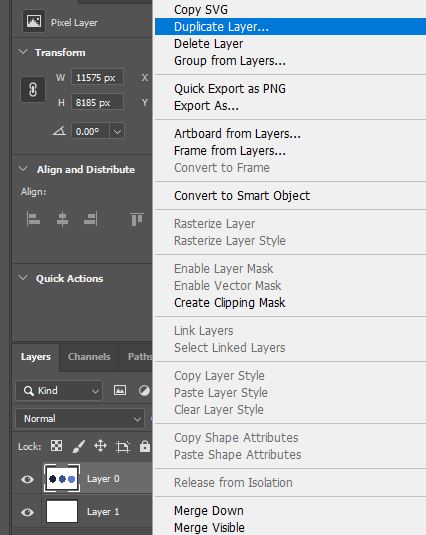
3: Add an Individual Layer Mask to the Original Layer and the Duplicated Versions
Next, we are going to use layer masks to make sure that each element is only visible on one layer, and each layer contains only one element.
To do this, let’s begin by adding layer masks to each of the layers- the original merged layer and the duplicates of it. This can be done by clicking on each layer one by one to make it active, then clicking on the New Layer Mask icon at the bottom of the Layers Window (the icon resembling a circle inside a white rectangle, as shown below).
Your Layers Window should now look something like the one below:
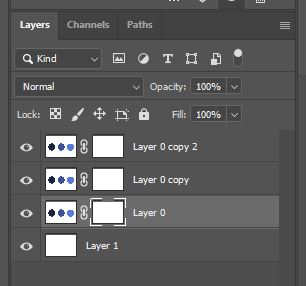
4: Use a Black Brush on Each Layer Mask to Hide the Whole Layer Except a Single Element, Keeping a Different Element Visible on Each Layer
Let’s now click on the layer mask thumbnail on one of the merged layers to make it active. We will focus on this layer mask first.
The aim of this step is to work with the layer masks of the layers to show only one different element on each layer. So, in this example, I would dedicate one layer to the top circle, one layer to the middle circle, and one layer to the bottom circle.
When working with layer masks, it is important to remember that a white brush is used to reveal areas of the layer, whilst a black brush is used to hide areas of the layer. Shades in between black and white create semi-transparent areas of the layer.
So, in this case, go ahead and use the Brush Tool (B) with a black color to paint on the layer mask over the whole layer except for the element that you want to keep on the given layer. You can see a preview of the layer mask in the Layers Window.

Then just repeat this process on each layer mask, keeping a different element visible on each layer.
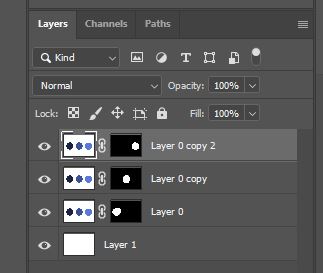
Once you have finished this process, you should notice that you have essentially ‘unmerged’ the layer and separated it into different layers for individual elements! You can now edit each layer independently, as if they had never been merged in the first place.
Method Two: Undo the Merging Action by Choosing Edit > Undo Merge Layers
This method couldn’t be quicker and simpler! If you have only just merged the layers (meaning that merging the layers into one was the most recent action that you completed) then you can simply undo it by hitting Ctrl [Win] / Cmd [Mac] + Z, or choosing Edit > Undo Merge Layers from the bar along the top of the screen.

Method Three: Undo the Merging Action by Clicking Backwards in Your History Window
If merging the layers wasn’t the most recent action you completed, but you haven’t closed the document since merging them, then you can still undo the action.
This can be done by heading to the History Window. If this isn’t already open, then you can open it by choosing Window > History from the bar along the top of the screen.
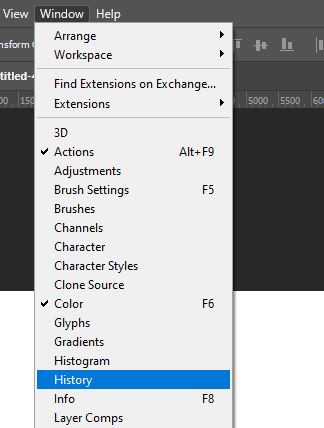
The History Window is a log of your previous actions that keeps track of the most recent edits you have applied to the document. By clicking on an earlier action here, you can effectively revert to an earlier state of your document, undoing any changes that have been made since that action.
In this window, scroll upwards all the way back to the Merge Layers action. Then, click on the action before, or above, this one. This will undo the merging of the layers, allowing you to retrieve the unmerged layers.
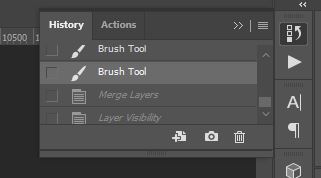
Note that doing this does, unfortunately, undo all the edits that you have made since merging the layers as well as the merging action itself. So, you will have to make all the edits again after heading back in your history.
Alternatives to Merging Layers
Of course, the best scenario would be to not have to unmerge the layers at all. So, what are the non-destructive alternatives to merging your layers?
1: Group the Layers
The main method is grouping the layers. To do this, simply select the desired layers by clicking on them whilst holding down the Ctrl [Win] / Cmd [Mac] key on your keyboard (bear in mind that if the layers are listed consecutively in the window, you can just hold down Shift whilst clicking on the top then the bottom layer of the group you want to select).
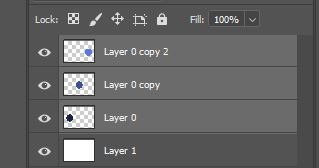
Once they have been selected, you can go ahead and click on the Create a New Group icon at the bottom of the Layers Window, as shown below, resembling a folder:
The group acts like merged layers in that you can move or transform the whole group at the same time or add the same adjustments to every layer in the group at once. However, unlike with merged layers, you can still access each layer separately, which will allow you to make any necessary tweaks later in your project.
2: Convert the Layers to Smart Objects
Another method involves converting your layers to smart objects. To do this, select the desired layers in the Layers Window, right click on them, and choose Convert to Smart Object from the list that appears.
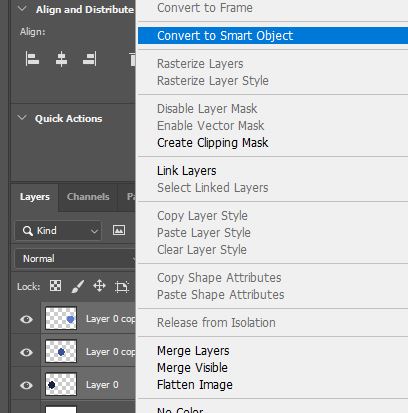
You are then able to right click on the smart object and open the referenced file. Here, you can make any changes to separate layers, which is something you cannot do with a merged layer.
BONUS
Hopefully, this tutorial has helped to give you more of an insight into the methods that you can use to unmerge your layers in Photoshop and has taught you more about some of the alternatives to merging layers so that you can avoid having to unmerge your layers in the future!
If you still don’t 100% understand how layers work in Photoshop, you can have a look to this video by Pixel & Bracket. It will teach you everything you need to know.
Hey, I'm a Professional Retoucher making $10k a month thanks to Photoshop.Register to my newsletter to get freelancing tips and a FREE Brush Pack in Bonus! My Newsletter


