
Taking a great photo is always the most rewarding and exciting part of a photographer’s job. I am sure you have all often found yourselves celebrating until you take a good look at the image and realize just how much noise there is within it.
But you will be glad to know that you do not have to get rid of the photo and give up straight away. We can rescue your photo by using any of a huge variety of noise reduction techniques, thanks to the wonders of modern technology.
In this article, we will focus on five of the absolute best methods you can use to completely remove, or at least reduce, the noise within your images using Photoshop. Whilst there are some other programs that allow for noise reduction, such as Noise Master, Noise Reducer Pro, and Noiseware, Photoshop is definitely the best one for the job, since it offers advanced tools through Adobe Camera Raw and allows you to apply noise reduction adjustments selectively, giving you more control over the effects that are applied.
The methods that will be discussed in this article can be summarised as such:
- Adjust Settings Within the Adobe Camera Raw Noise Reduction Panel
- Use Photoshop’s Noise Reduction Filter
- Blend Together the Best-Exposed Areas of Images Taken with Different Camera Settings
- Stack Several Shots as Smart Objects Using the Median Stack Mode
- Use Luminosity Masks to Fine-Tune the Application of the Effect
1: Adjust Settings Within the Adobe Camera Raw Noise Reduction Panel
One wonderful aspect of Photoshop is it’s Adobe Camera Raw setting, that provides you with tools to adjust certain settings that you would otherwise only be able to adjust within Lightroom, effectively combining the capabilities of two programs into one area.
We can take advantage of the Adobe Camera Raw panel when reducing the noise in an image. The Noise Reduction panel is pretty much identical to the one in Lightroom.
So, let’s go ahead and start this method by clicking File > Open to open the photo that we want to remove the noise from in Photoshop. For this tutorial, we’re going to model the technique using this photo by Artem Saranin from Pexels, in which we manually enhanced the noise slightly to show the full capabilities of the noise-reduction processes.

With the photo open, head to the Layers Window and right-click on the image layer. From the list that appears, choose Convert to Smart Object.

Now that the layer has been converted to a smart object, you can apply the Camera Raw filter! To do this, select Filter > Camera Raw Filter from the Options bar at the top of the screen.

You will then notice that the Camera Raw Window opens, in which we’re going to be working in the Detail Tab. To open this, click on the icon highlighted in the screenshot below, located near the top of the window.

Within the Noise Reduction section of the Detail Tab, do the following using the sliders next to the respective settings:
If the image contains luminance noise:
- Increase the Luminance value until the luminance noise is visibly reduced. Make sure that you don’t lose too much detail, but it’s okay to lose some since we can bring it back using the other settings later.
- Alter the Luminance Detail slightly
- Increase the Contrast to recover some of the contrast that you lost by making the previous adjustments, particularly the first one.

If the image contains color noise:
- Adjust the Color until the color noise has disappeared to as much of an extent as possible
- Adjust the Color Detail in order to fine-tune the impact of the previous setting
- Adjust the Smoothness, making sure not to lose too much of the detail within the image

When you are happy with all these settings, hit the OK button to apply the edits and close the window.

You should hopefully then notice that you have managed to efficiently reduce the amount of noise within the image!

2: Use Photoshop’s Noise Reduction Filter
If you are looking for an even quicker, more automatic fix, you can try out Photoshop’s Noise Reduction Filter.
As always, begin your work by opening your image in Photoshop. You can do this by selecting File > Open from the bar at the top of the screen. For this tutorial, we will be demonstrating this technique on a photo by Vlad Bagacian from Pexels, in which we have enhanced the noise manually in order to show the full capabilities of the method.


With the image open, we are going to go ahead and add the Noise Reduction Filter. This can be chosen by selecting Filter > Noise > Reduce Noise from the options bar along the top of the screen.

In the main section of the filter, the noise-reducing effect can be controlled by adjusting the level of it using the sliders entitled Strength and Preserve Details. Hit the OK button to apply the effect when you’re done.

Feel free to apply the effect as many times as necessary, until you are happy with the outcome!

3: Blend Together the Best-Exposed Areas of Images Taken with Different Camera Settings
The next method that we will discuss involves a photography technique known as ‘Exposure Bracketing’. It involves taking multiple photos of the same composition that have different exposures, meaning that different areas will be grainy in different images. You can then composite the photos together to create an image that just contains the non-grainy, best-exposed areas.
You can see an awesome guide to exposure bracketing here, in this article by Fstoppers. Remember that for this technique, you’ll need to have taken multiple images of the same composition. If you only have one single image that you want to remove the noise from, then you might prefer to use one of the other techniques that we have mentioned in this article.
So, once you have taken the photos, how can you blend the best areas of them together?
Let’s begin by heading to File > Open to open each individual photo in Photoshop.

Once you have got them all opened, you will want to bring them all into a single document. To do this, you can just use the Move Tool (V) to click and drag each of the images into the same document as one of them. You can select the Move Tool from the top of the toolbar down the left of the screen, as displayed by the icon shown below.
Using this tool, click and drag the image up to the title of the document you want to move it to in the documents bar near the top of the screen and hover it over it.
When the view switches to the destination document, simply go ahead and drag the image down into the canvas area. You will see that all the layers that you drag appear as a new layer in the document that you bring them into.

Whether you have two, five, twenty or any other number of images, look at the photos and decide which areas of them you want to keep or get rid of. For instance, let’s say you have two images: one in which the sky is grainy but the rest of the image is perfect, and another in which the sky is perfect but the rest of the image is grainy.
You’ll want to use layer masks to get rid of the respective grainy areas in each photo so that you will be left with an image that doesn’t have any grain. So, in the aforementioned example, that would mean getting rid of the grainy sky in the first photo and replacing it with the perfect sky from the second one.
To add a layer mask, click on the layer to which you want to add it in the Layers Window to make it active, then click on the icon shown below at the bottom of the same window.
When working with layer masks, always remember that painting an area black makes it invisible and painting an area white makes it visible. So, select the Brush Tool (B) from the toolbar down the left of the screen by clicking on the icon shown below.

Then, choose the color, size, softness, and opacity of the brush. To gradually make areas of the layer invisible, use a soft black brush of low opacity. To make distinct areas of the layer invisible, creating a harsher effect (which you might want if there are clear boundaries between the areas you are blending), use a hard black brush of 100% opacity.
If you want to bring areas of the layer back, then switch the color of your brush to white (you can hit the X key on your keyboard to quickly switch between black and white) and paint over the sections that you want to restore.
Then just do the same for each of the layers- add a layer mask, then paint the areas you want to remove with black and use white to restore any areas you want to keep.

And, just like in the example below, you should see that you’ve managed to combine the best areas of all your photos to create a perfect, or near-perfect, image that contains little or no grain!
Here’s the outcome we achieved when working with an image by Photo by Hristo Fidanov from Pexels, which we created multiple versions of by adjusting the brightness to mimic the outcome of exposure bracketing. You can see that we managed to get rid of the noise in the tree section.

4: Stack Several Shots as Smart Objects Using the Median Stack Mode
This next technique is similar to the previous one in that it involves multiple photos of the same composition rather than just one. However, it differs in that the images are taken with the same camera settings.
So how do the images differ if they’re taken with the exact same camera settings and composition? Well, digital noise always appears randomly in photos. This means that the same pixel will appear differently in every image, with random changes in brightness or color.
So, in this method, we’re going to use the Median Stack Mode to tell Photoshop to make an average of each pixel, effectively canceling out the noise in the images and forming one photo made up of only areas without noise. It is, in fact, one of the most effective noise reduction techniques.
We will begin by importing all our images separately by choosing File > Open to open them all in Photoshop. Once you have imported them all, you will notice that they all exist in separate documents, as demonstrated below.

However, for this process, we will need all the images to be together in one document as separate layers. So, you will need to pick one of the documents to be the one that you will work in, then just use the Move Tool (V) to click and drag the other images into that document.
This can be done by simply clicking on the image within each document and dragging it up to the name of the document that you’ll add all the images to in the bar near the top that displays the active documents.

After hovering an image over the destination document for a moment, you should see that the destination document opens. Now, just drag the image down onto the canvas and release it to see that it’s now been moved to the same document as another image!
Do this for all the photos until they’re all in one document. You can see them all as separate layers in the Layers Window.

Once you’ve imported all the images, select all the layers in the Layers Window by either holding down the Ctrl [Win] / Cmd [Mac] key and clicking them all individually, or clicking the top layer then holding down the Shift key whilst clicking on the bottom layer.

You’ll see that they’ve all been selected when they’re all highlighted, like in the screenshot above.
With all the images selected, head along the top of the screen to Edit > Auto-Align Layers. Choose the Auto option in the window that opens up.

This will make Photoshop check if the compositional elements of the images line up in every layer and will cause the program to make any automated changes if they do not align.
Then, with all the layers still selected, let’s select Layer > Smart Objects > Convert to Smart Object from the top of the screen.

Now that they have all been converted to smart objects, we can change the Stack Mode to Median by going to the top of the screen again and choosing Layer > Smart Objects > Stack Mode > Median.

You should then hopefully see that Photoshop has made an average of every pixel, meaning that the noise levels within the image have been significantly reduced.

5: Use Luminosity Masks to Fine-Tune the Application of the Effect
Used in conjunction with another one of the effects that we have listed, Luminosity Masks allow you to adjust the outcome of the noise-reducing effect and apply the effect selectively, to different extents in different areas.
Add this process as an extra step to any technique and you will have the freedom to apply the changes made to the noise levels only to certain parts of your photos, giving you more potential to create an awesome outcome! You can protect areas where you want to preserve the general sharpness and detail, whilst applying the effect to areas you want to change.
For this process, we’re going to discuss how you can use it in conjunction with the first method mentioned in this article, but feel free to adapt it so that it fits in with any other noise reduction technique you might be using.
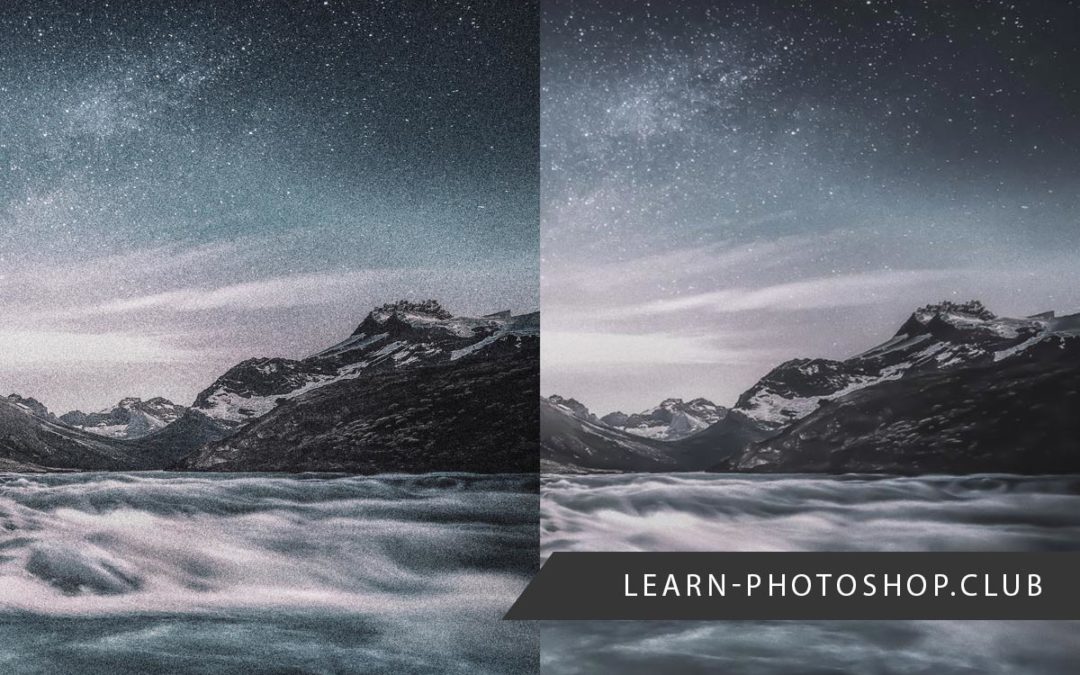
Let’s begin by importing your image (File > Open), then converting it into a smart object (Layer > Smart Objects > Convert to Smart Object). We’re using a Photo by eberhard grossgasteiger from Pexels.

Next, we are going to duplicate the image layer. You can do this by right-clicking on it in the Layers Window then choosing Duplicate Layer from the list of options that come up.
Alternatively, you could hit Ctrl + J [Win] / Cmd + J [Mac] or choose Layer > Duplicate Layer from the options bar at the top of the screen.

You will now notice that two smart objects of the same photo exist as separate layers in the Layers Window, as shown below.

Then, make sure the top layer is active by clicking on it in the Layers Window and go ahead and apply to it the noise-reducing edits listed in the first method of the article.

As you can see, the noise-reducing edits have significantly reduced the level of detail in the image. We can use a luminance mask to preserve these details.
Once you’ve completed the process of the first noise reduction technique, make sure once again that the top layer- the edited one- is active by clicking on it, then open the Channels Panel and, whilst holding down the Ctrl [Win] / Cmd [Mac] key click on the RGB Channel at the top of the list.

Now, head back into the Layers Window and hold down the Alt [Win] / Option [Mac] key on your keyboard whilst clicking on the New Layer Mask Icon, shown below.
You’ll now see that the luminosity mask has been applied to the top layer and therefore the noise-reducing effect has been made invisible in the brighter areas and is still visible in the darker areas, in which there is often more noise.
Hopefully, you’ll now have achieved a noise reduction effect that preserves the detail in areas that you want to remain sharp, and that functions well in the areas from which you want to remove the noise!

As you can see in our example above, the stars now have their original detail back, and the bright areas of the water don’t look as smoothened as they did before, even though the levels of grain are still being reduced effectively.
Pretty cool right? It’s a wonderful and quick way to control the effect of noise reduction, and part of what makes Photoshop so great for this editing process!
Which Method Should You Use?
One thing that determines which method you should use is the number of photos you have taken of the composition. Most of the time, if you’ve only just noticed the noise in an image and didn’t prepare to combat it beforehand, you will only have one image from which you want to remove the noise.
If this is the case, then you’ll want to use either the first or second method, adding on the luminosity mask step if you want to adopt a more advanced technique.
If, however, you haven’t yet taken the photo and therefore have time to prepare beforehand, you can plan to either take multiple photos with different camera settings and use the third method or take multiple photos with the same camera settings and use the fourth method.
These methods usually work well, so if you can take multiple images of the same composition then it’s good to opt for these ones.
BONUS
And that’s about all there is to know about how you can apply the five best techniques to reduce noise in Photoshop!
Want to find out more about how to remove or reduce the noise in your photographs? Check out this video by PHLEARN that covers the topic.
Hey, I'm a Professional Retoucher making $10k a month thanks to Photoshop.Register to my newsletter to get freelancing tips and a FREE Brush Pack in Bonus! My Newsletter

